Monday, August 12, 2013

Wine Glass Painting

I recently visited a local winery for a wine glass painting event and look what I did:
 
 
There was an art teacher there to walk you through different technics for painting flowers but overall you could do what you wanted.  
 
If you are interested in doing any of your own glass paintings, here are the basics you need to know:
 
1. Clean glass with rubbing alcohol before painting.
 
2. Use enamel paints.
 
3.  To set paint - put glassware in a cold oven, heat to 350 degrees, bake for 20 minutes, turn oven off and let glass come back to room temperature in the oven. 
 
4.  Handwash glasses.
 

Melted Crayon Art

There has been a lot on Pinterest with melted crayon art and with back to school crayons prices, I figured it was about time to give it a try.
 
First I painted my canvas with a nature-y landscape. 
 
 
Then I scoured my daughters box of crayons for every hue of green I could find and supplemented with a few new crayons.
 
Since most of the crayons I was using were old broken nubs, I opted to peel the paper off.
 
Then I hot glued the crayons to the canvas.
 
  Helpful tip:  put the hot glue on the canvas and  push the crayon onto it.  Otherwise the hot glue will instantly melt the crayon in your fingers resulting a minor burns and a few choice words that shouldn't be used in front of your children. 

 
To melt the crayons I used my craft heat gun but I hear a blow dryer set on the hottest setting works too.  I held the canvas at a slight inverted angle so the melted crayons would "grow" up the canvas. 

 
Then I popped the heads off some clearance out daisies and hot glued those to the canvas as well. 
 
To completely finish the project I'm hoping to run across a garage sale or seriously clearance out picture frame that I can remove the glass and pop the canvas in its place. 

Thursday, July 25, 2013

Holly's blanket

Darn that third child in the family.  They get the best of everything.  While the other two have simple "blue blankies" (that they love and adore by the way), the third child gets the 'Momma had ambition and desire to accomplish something' blanket.
 
I purchased 6 - fat squares or big squares or whatever the precut 18x21 inch squares of material at JoAnn Fabrics.  I cut each of them into 4 - 4 inch strips.  Then sewed two of them end to end to create a long strip. 

 
I then bought 1/3 yard of the black material to sew a 6 inch strip on the top and bottom.  This was mostly to add length but also because the quilt binding (I'm purchasing the satin 2 1/2 inch stuff) would have covered almost all of the 4 inch strips.  Make sense?
 
I also purchased a flannel fairy piece of material to sew on the backside to give extra warmth and snuggle-ness to the quilt.

 
To bind the entire quilt together I sewed (almost) straight lines down the quilt.  The only thing left for me to do is decide what color binding I want.  For those who know me, know that I'm leaning towards a warm and cozy gray color.  It coordinates with all the colors on the front and goes perfectly with the pink on the back. 
 
I'm trying to break out of my shell, step out of my box, go out on a limb and trying to envision this quilt with a binding of a different color but can't.  So I'm asking for a little help.  If this were your project, what color binding would you add??

Reindeer Cupcakes

Its July 25th or otherwise known as Christmas in July!!
 
I can't let a holiday like this just pass me by. No, no, no, no. 
 
It must be celebrated. 
 
And with cupcakes to boot.
 
My cupcake.
 
 
Bree and Jakes cupcakes.


Monday, May 6, 2013

Raised Garden Beds

This is actually a Homemade Memory four years in the making.
 
A while back I saw an episode of some unknown gardening show that was all about raised garden beds and was inspired.  Of course I was too excited to sit and research or draw out plans.  I ran to the local Tractor Supply Store, bought some bins and asked the hubby to make it work.  This is what he lovingly built for me:
 
 
That first year and every year since Bree gets involved in the planting and caring of the raised beds.  This year she wanted to try growing strawberries so we're giving it a go. 

 
The other raised bed is, has and always will be dedicated to growing green onions and chives for the hubby.  He loves onions and since he did build the beds I think its only fair to give him what veggies he wants.
 
The plants in the corner of the above bed are the pumpkin plants waiting to be put into the ground.  I need to rent a rototiller before doing so.
 
Due to having a newborn coming before too long, the main portion of my garden will be pumpkins.  But its just not summer unless you grow your own tomatoes.  Two of our containers will soon be home to cherry tomato plants (hopefully the perfect size for stuffing full of bacon and cream cheese) while the other two containers are busy growing basil plants for homemade pesto.


Until harvesting time, Bree won't have too much else to do with the garden.  I find weeding and pruning plants therapeutic whereas Bree finds it a time to play in the dirt, dig for worms and potentially hurt the plants.  In another week or so she'll get to plant flowers in her own flower pot and do whatever she wants with them.
 
Whether it be veggies, herbs or flowers, I think its very important to get your children involved in a garden.  Its all part of caring and protecting of nature and our environment.

Thursday, April 25, 2013

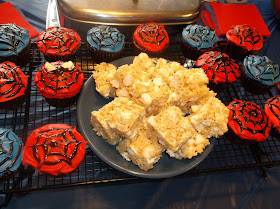
Spiderman cupcakes

Got a little boy who is infatuated with Spiderman? 
 
Here is a technique for making Spiderman cupcakes that so easy, even my 5 year old can  and has done it.
 
Start out with a cupcake frosted in red.
 
Using a Wilton's black gel frosting tube, put a large dab of frosting in the center of the cupcake.  Next draw a circle around the dab leaving about 1/4 inch gap.  Then draw one last larger circle leaving a gap between the medium sized circle and the edge of the cupcake.
 
Or you could be like my creative husband and draw a spiral.


Then with a toothpick, start in the blob of black in the middle of the cupcake and draw a line to the very edge.

After Jacob had fallen asleep for the night, we got Bree out of bed to come help make Jacob's birthday cupcakes.  Its special moments like these that she'll never forget.
 
Repeat this 6 or more times to achieve a spider web look.


Simple, no?
 
Don't forget to do some blue cupcakes too.

 
For added Spiderman detail, you can attempt to add eyes made from mini Oreos cut in half (left hand side, middle cupcake) but I was running out of time and the Oreo filling kept falling off the cookie part so I abandoned the idea.
 
 
The cupcakes for the Spiderman themed party were a hit - Spidey eyes or not.

 
Jacob had one cupcake....

 
...after another.


Wednesday, April 24, 2013

Pumpkin Patch

After some mild success with our window greenhouse herbs, I thought we'd try something new.  Something that will hopefully be able to be replanted outside in a few weeks.
 
 
PUMPKINS!

 
A little word to the wise...  Pumpkins grow fast. 
 
After one week.
 
Really fast. 

After two weeks.
 
At this rate we may have pumpkins by mid-July.  Assuming it ever warms up enough to plants these babies outside.

Friday, April 19, 2013

Just Because

Sometimes you just have to bust out the (washable) paints, a roll of paper and let 'em go.
 
No plans.  No restrictions.  No purpose. 
 
Just paint and have fun.
 
Then decide what to do with it.


Tuesday, April 9, 2013

Sewing Necessity

I like to sew but its something that doesn't come easily to me.  It all seems so easy and logical but then something somewhere sifts, seams don't line up, the frustration of having to rip out what I've just done to begin again and, of course, the blood stains on the projects from being prick with multiple pins.  Sometimes its just more effort than its worth.
 
But then a miracle happens.
 
I can't tell you when.  I can't tell you where.  But at some point in my life I was introduced to the ultimate life saving, profanity stopping, finish what I start in one day wonderful product that is: 


I used Spray 'N Bond while making the Hopscotch mat for the children's Christmas present and loved, loved, loved it.  I sprayed my pieces of felt, stuck them where the needed to go and sewed the night away.  No pins, nothing was crooked because of not being properly pinned, no tears of frustration for me.  If I accidently sprayed in areas that I shouldn't have, not a problem.  It washes away after one wash.  I definitely will be using this product when Its time to teach Bree how to sew.
 
FYI - To help control the mess, I placed my felt on a piece of newspaper before I used the Spray 'N Bond

Monday, April 8, 2013

Clay Pot Resurrection Garden

Take a clay saucer and pot of desired size.
 
 
Bury the pot in dirt and add some pebbles and a large rock in the front.

 
Top with grass seed, a little more dirt and water, water, water.

 
Send kids on a stick hunt in the yard to make your crosses and what you've created is a beautiful Resurrection Garden.

 
If planted at the right time, grass should be growing by Easter morning.
 
We did not plant ours at the right time. 
 
 
Easter morning our garden still looked a little dead. 
 
However, just given a few extra days, it was full of life and the promise of new life, just as Easter is meant to be.

 
I saw this craft on Pinterest last year but clay saucers or pots were not in stores at that time.  I kept the idea in the back of my head so that when they were all I had to do was pick up my desired sizes and tuck them away in my Easter totes and -voila - everything was ready to go for this Easter.